

If you talk to most pro photographers (especially photo journalists) and ask them what they use for noise reduction and the answer will almost always be the same – Noise Ninja. This is the standard by which all other noise reduction products will be measured, and the grand daddy of them all. Big name sites like RobGalbraith.com and Luminous-Landscape.com have sworn by this product, and it is the only product I used for noise reduction prior to this article.
PictureCode is all about noise reduction and is very hard core. Just read their docs or talk to anyone on the PictureCode team, and you’ll quickly discover that this company knows a ton about noise reduction. They’ve given their users the most options to calibrate their noise profiling through camera and scanner profiles so you can get the best results possible for your device. In addition they make profiling charts available so you can create your own profile for your camera and lens for the most advanced auto profiling possible.
Visit their site for some samples of what this product can do, and watch their videos which demonstrate how to use Noise Ninja, do batch processing and how to integrate with Lightroom.
How does it work?
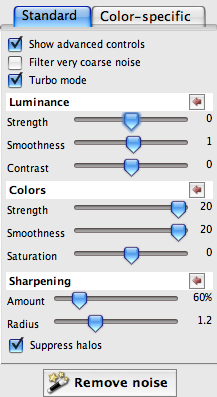
Of all the products in this roundup, the user-interface for Noise Ninja was probably the complex and intimidating. This isn’t necessarily a negative because it is also the most advanced and offers significant control over how your image is processed. Here’s the user interface for Noise Ninja 2.2 (build 2.2.0b):

Just like with Noiseware, I do my noise reduction changes on a merged layer (CTRL+SHIFT+ALT+E) in Photoshop so I can undo if I change my mind later. However, unlike Noiseware, you can use the Noise Brush to control where noise reduction is applied and where it is masked. This is similar to the brush functionality in Nik Software’s Dfine product, but I prefer Dfine’s implementation of U-Point and Brush much better. Some of you might prefer the Noise Brush since it avoids masks and returns results with the edits made in the user interface.
These guys know their stuff
The team at Noise Ninja is all about noise reduction – that’s all they do – so they are hard core about what is required to get the best balance of noise reduction and detail preservation. I found the following excerpt from their users guide to be very useful in determining how to do noise reduction based on image types:
When to apply noise reduction
As a general principle, you should apply noise reduction as early as is practical in your workflow - ideally, before other editing operations like tone adjustment, color balancing, sharpening, or resizing. Adjustments like these can shift pixel values and distort noise levels in unpredictable ways, and this can make it more difficult for Noise Ninja to remove the noise effectively. Sharpening and resizing, in particular, should be deferred until after noise reduction when possible. (Modest amounts of in-camera sharpening are usually okay, however.)
If you shoot RAW: If you use a raw file format like Nikon NEF or Canon [CR2], it might require some experimentation to determine the best way to integrate Noise Ninja into your workflow, and you also might have strong preferences regarding how you want to use the different tools. Raw conversion utilities differ widely in the way they treat noise, and they typically allow numerous adjustments to be made during conversion. Some users apply minimal adjustments during raw conversion, apply Noise Ninja, and then make other adjustments using Photoshop or some other editor. This allows them to profile their camera and re-use the noise profiles for each image. Other users make arbitrary adjustments during raw conversion, and then they use the manual or automatic profiling tools … to create a noise profile for each image.
Noise Reduction Roundup Images
This product is one of three excellent after-market products that I am reviewing as part of my Noise Reduction Roundup article.
Initially I processed the original images in Canon’s Digital Photo Professional (DPP) 3.5. When one of the product engineers raised a concern about JPEG compression I decided that it made more sense to import the RAW into Photoshop via Adobe Camera Raw (ACR) 5.2. I then used that single PSD to work on all the photos.
Here’s the exact process I used:
- Open CR2 in Photoshop CS4 32-bit on Windows Vista 32-bit
- This launches ACR 5.2, go to the Detail tab and set Noise Reduction to 0 (XMP data from disk has cropping info – XMP was generated from Lightroom 2.3 where I catalog my files)
- Open object as a Smart Object at Original Size
- Duplicate the layer twice
- Rasterize the third layer & copy 3 more times
- Name each layer (original, acr, photoshop, noiseninja, dfine, noiseware)
- Save PSD (these are huge)
- Apply corresponding filter to each named layer (using layer comps to define each layer and hide other layers) using default values (run filter, press OK when dialog appears)
- Save PSD
- Switch to each layer (using layer comps) and do a File | Save As… JPEG and choose 12 when the dialog comes up (although by accident I did 10 on Tokyo for all of them).
- For Chicago, I created a Text layer watermark and showed both the image and watermark layers.
- I realized that these images had the wrong color profile, so I had to re-open them all, apply the sRGB color profile and save again at JPEG 12.
The images below are part of the roundup images. The original link shows a JPEG 12 version of the original with no noise reduction added (the default setting is always to add a little). The Auto link was processed on a duplicate layer using the automatic settings (i.e., the same results you’d get if you ran the filter and just hit OK right after installing this product). This image was saved as JPEG 12 in Adobe Photoshop CS4. The Suggestion version was processed the same way, but with the instructions found below the links. As you can see from the images below the results are outstanding. Hover over images to see before and after (using auto) results, but you have to look very carefully. Hints about where to look are included for each image, but its best to click the hyperlinks to see the full size images and switch between tabs in your browser to see the differences. You may download and compare them in Photoshop, but please delete them when you are done comparing.
This article includes a before, auto and suggested 100% crop to compare the differences. For the best results, click on these images to view them at 100%.
The final article will include six 100% crops next to each other so you can more easily see the differences together, so stay tuned to this entire series for the best results.
DISCLAIMER: This isn’t a scientific comparison. The reader should compare these images for relative noise, but any final judgments should be made by conducting your own experiments using your own images on your image editing system.
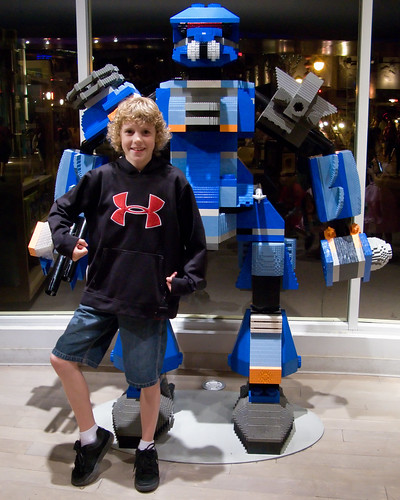
Canon G9 @ ISO 400
Here’s a shot I took with a Canon G9 at ISO 400 which was fairly noisy. Hover over the shot below to see the before and after (pay attention to the top of the image to see the bad noise in the original). This is straight out of camera with no post-processing, so it still needs a little work (especially sharpening):

| Original | Auto Fix | PictureCode Suggestions |
Fernando Zapata, a Senior Programmer at PictureCode, offered the following suggestions on how to improve the default results:
- Used ACR to convert the raw file, using the ACR defaults but with all sharpening and noise reduction turned off.
- Modified auto profile (see screenshot below) by adding and removing some selections.
- Tweaked luminance strength and smoothness (see settings file).
- Used the noise brush on the boys hair.
- Used it on his socks (as a test). It brought back some fine detail you can spend a lot of time tweaking with the brush but it is best to pick the areas where it is worth your time. In this case the kids hair.

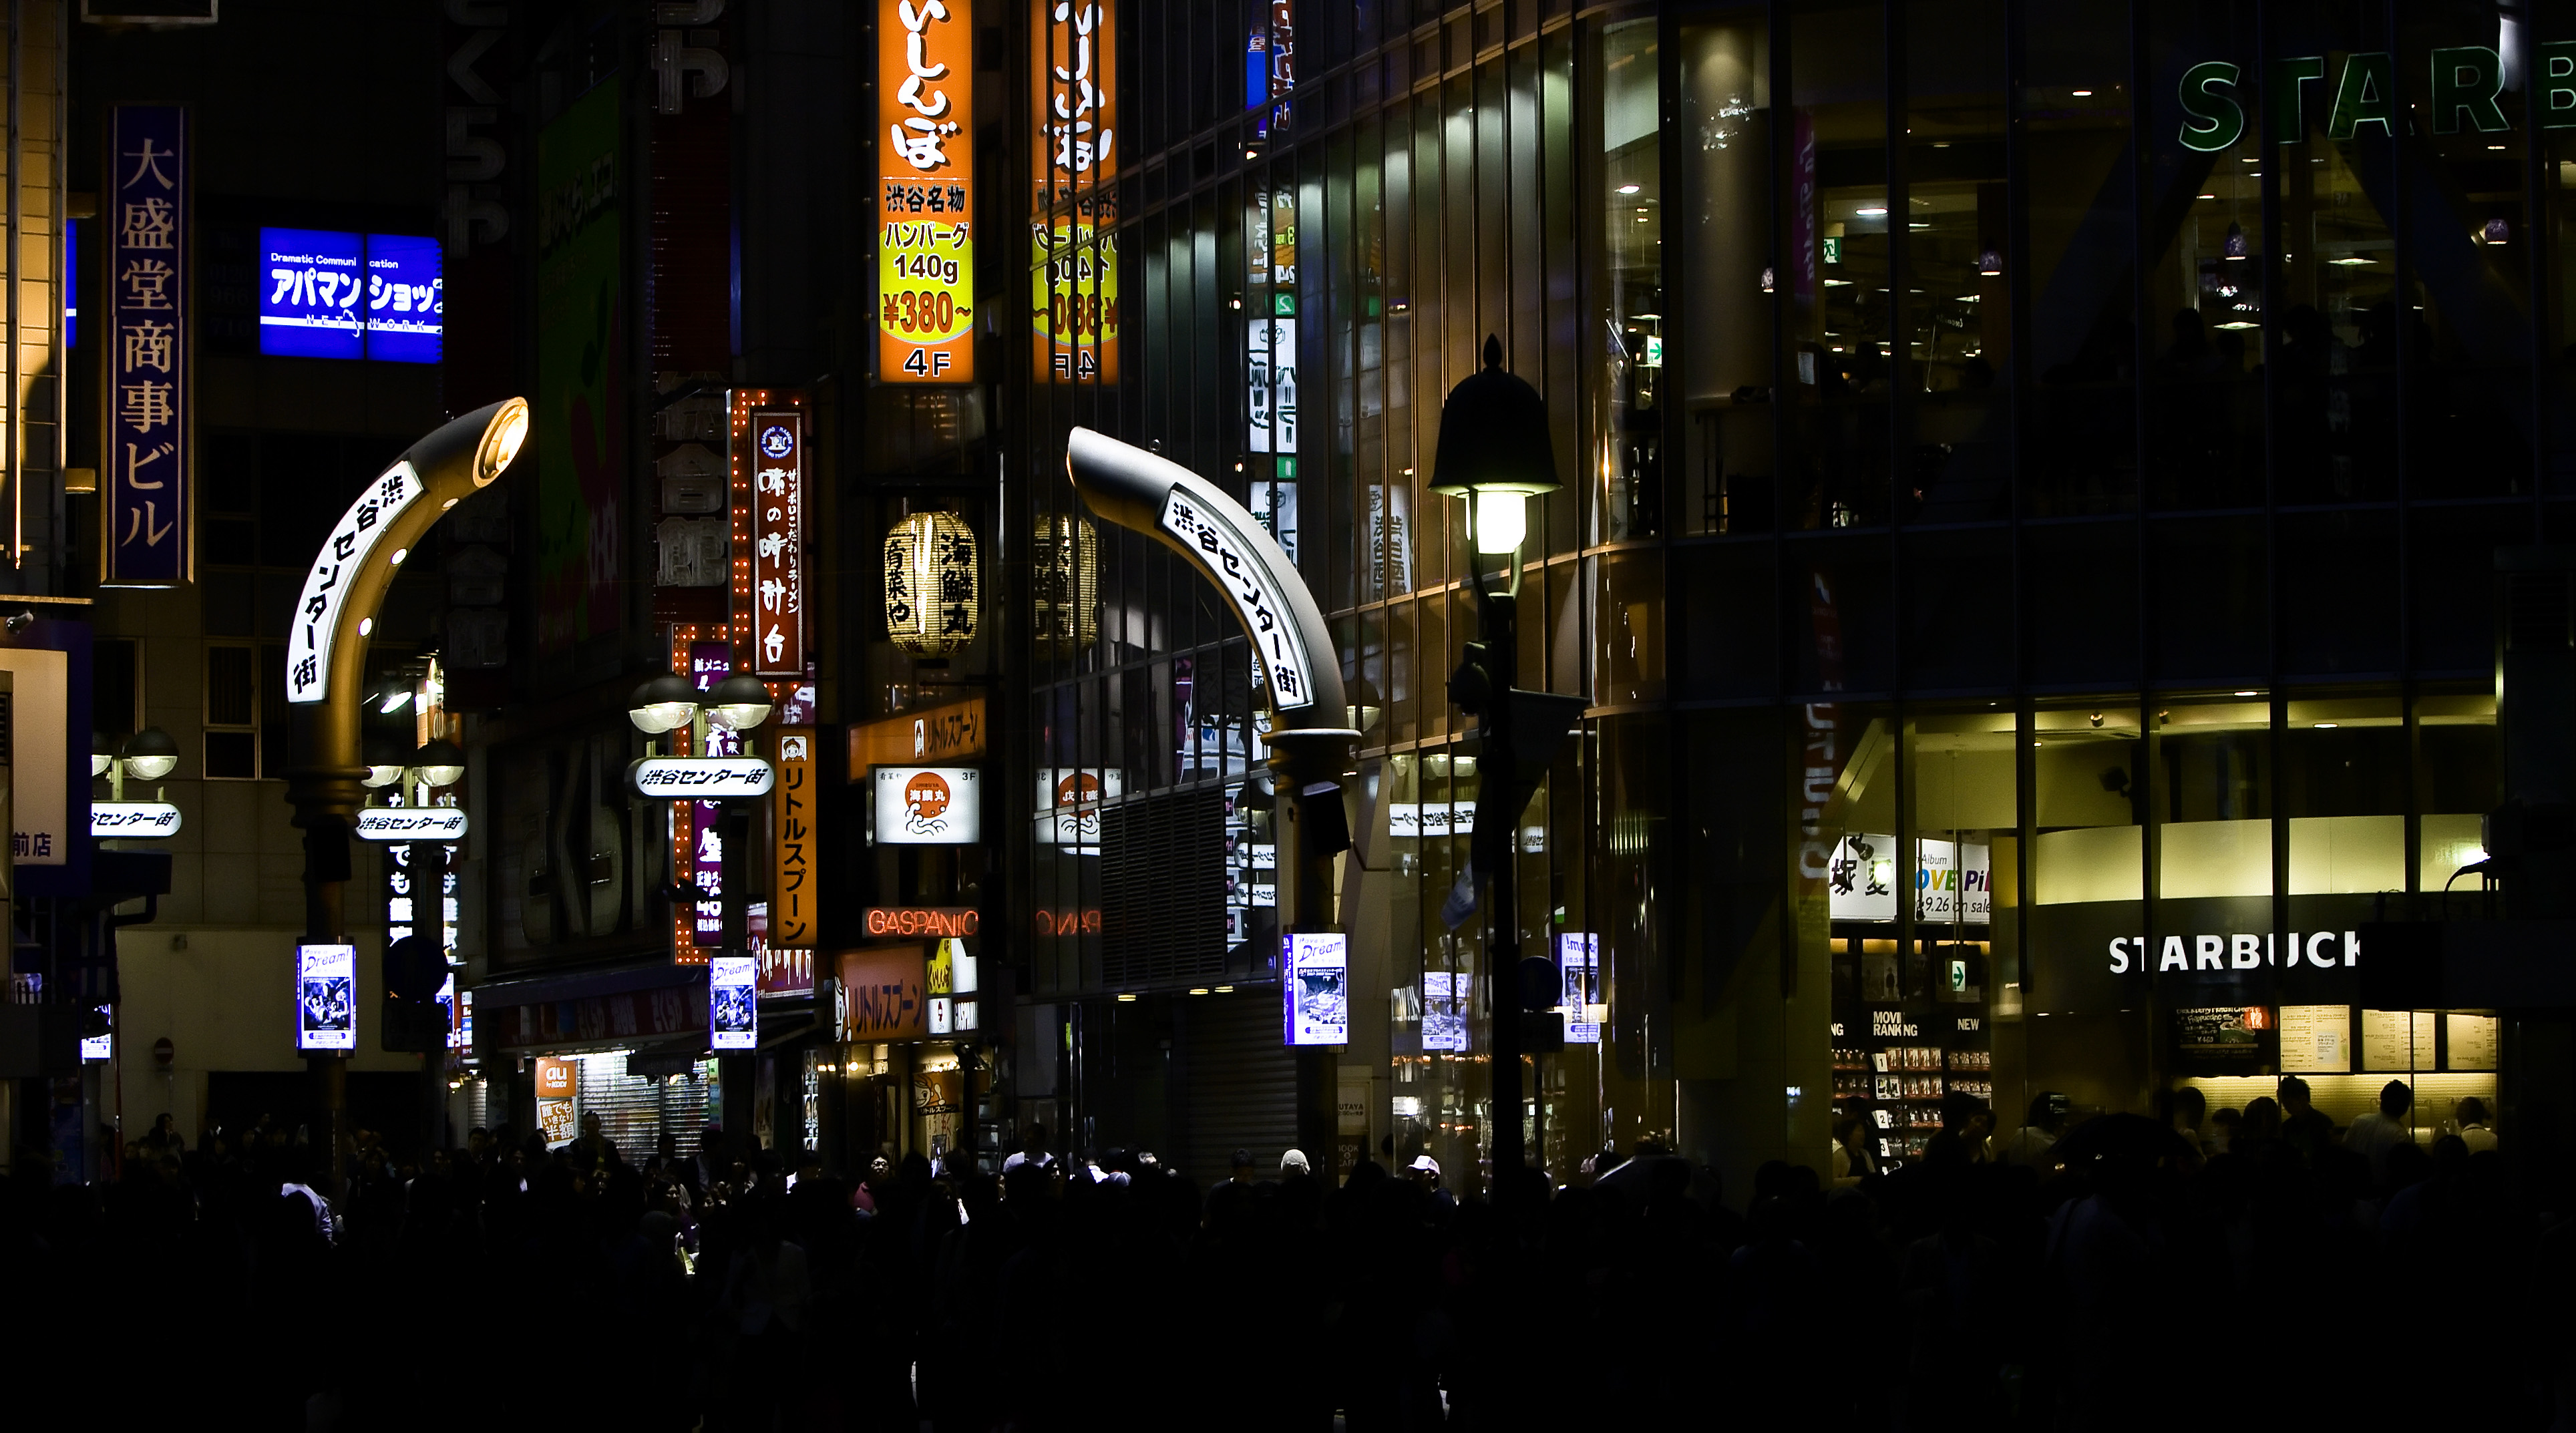
Canon Rebel XTi @ ISO 800
Pay attention to the building in the back of the scene on the bottom left side of the image when you hover in and out below:


| Original | Auto Fix w/o camera profile | PictureCode Suggestions |
| Auto Fix w/ camera profile |
Fernando Zapata, a Senior Programmer at PictureCode, offered the following suggestions on how to improve the default results:
- Used ACR to convert the raw file, using the ACR defaults but with all sharpening and noise reduction turned off.
- Modified profile see screenshot.
- Just used the defaults for the filter settings.
- Touched up with brush the following areas:
- The blue sign
- The portion of the red sign with white letters that is right of the blue sign
- Used the smallest brush size small portions of the wires between the two lamp posts. This is not necessary but if you wanted to enhance even these very small details you could.

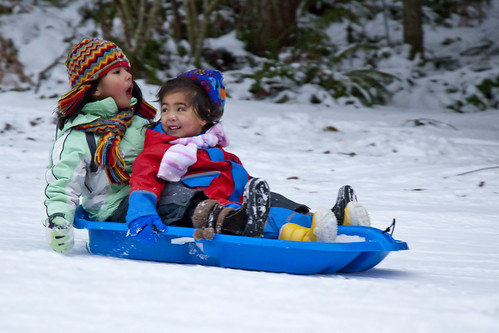
Canon 5D Mark II @ IS0 2500
Pay attention to the little girl’s hair when you hover in and out below:

| Original | Auto Fix (No Camera Profile) | PictureCode Suggestions |
| PictureCode Profile | My Custom Profile |
")
- Did this one on my Mac [at home].
- Used Lightroom with same settings for raw conversion as others in ACR.
- Used standalone version (same noise reduction engine).
- Used manual profile (see screenshot).
- Set chroma settings at max.
- Increased luminance smoothness just a tiny bit above the default to help with some of the green noise in the younger girls face.
- Didn't use the noise brush on this one as I didn't feel that it needed it but you could use it to touch up the most important parts of the image.

Trouble with Noise Reduction in Reds
One of the observant readers of this blog pointed out to me that none of the products in this review seem to be controlling noise in reds as well as they do in other areas. Here’s a good example that shows the problem:
Jim Christian, Founder of PictureCode, shared this explanation of this phenomenon:
I've noticed this with saturated reds on a few occasions. I haven't had a chance to analyze it carefully, but I suspect there are multiple factors that may come into play to varying degrees, depending on the image and the camera. E.g. white balance scaling (red can be scaled twice as much as green and blue for daylight or cloudy white balance for a 5d Mk II); noise-amplifying off-diagonal terms in color correction matrices replace some relatively clean green with high-noise blue in the corrected red channel; lower "headroom" for saturated reds in some color spaces (i.e. it seems relatively easy to bump up against gamut boundaries in the reds, resulting in lower effective available precision); and the standard methods used to separate luminance and chroma components (and perhaps inaccuracies in their correspondence to human perceptual responses).
Canon 1D Mark III @ ISO 3200
Pay attention to the building on the left side of the image when you hover in and out below:


| Original | Auto Fix* | PictureCode Suggestions |
| PictureCode Profile* | My Custom Profile |
* = There are some slight color variations to these two images due to an accidental AdobeRGB –> sRGB color profile conversion. No other images in this set are impacted by this issue, and all can still be compared for relative noise. The Auto version used in the 100% crops was from the “My Custom Profile” image. Here’s the profile image I used to build my custom profile:
")
Fernando Zapata, a Senior Programmer at PictureCode, offered the following suggestions on how to improve the default results:
- Used ACR to convert the raw file, using the ACR defaults but with all sharpening and noise reduction turned off.
- Opened in Noise Ninja and created a manual profile by selecting uniform regions at different of various colors and tones.
- Tweaked the luminance and strength and smoothness sliders using the standard strategy we recommend in our users guide. This is where each photographers preferences will vary the most. I've gone with what looked best in my eyes.
- I turned on the coarse noise option to help with the very low frequency noise.
- I looked for areas in the image where I felt to much detail had been lost and use the noise brush set to luminance to bring back the detail. I brushed the following areas:
- I brushed along building on the left hand side to help bring back the vertical lines.
- I brushed along the waves to bring back wave detail using large brush strokes as the waves made didn't need much luminance noise reduction. I also brushed along the red waves and with the brush set to chroma.

Conclusion
Before this round-up, this was the product I had purchased and used regularly as it has long been known as the most popular product used by the pros. I was happy with the results and thought it was a good product, but the user-interface isn’t as friendly as some of the others here. In real-world use, if it didn’t give me the results I desire, I would do selective noise reduction using masks or on a single channel (usually the blue channel) only. If you want the most advanced noise reduction solution which offers ultimate control via camera profiling, then nobody in this round up can touch Noise Ninja – period. However if you want to make the most of this product then plan on learning what all of those controls in Noise Ninja do, and ordering a camera calibration chart from PictureCode to create profiles specific to your camera. This will mean a significant time investment up front on your part, but in the end it will give you the greatest control over reducing noise without losing detail of any product here.
PictureCode is a proud sponsor of the The “Ronmart.blogspot.com Greatest Save” Contest, and is donating 4 FREE copies of Noise Ninja Professional to readers of this blog!
Use the links below to view other articles in this roundup:
2 comments:
I see that Picturecode has a good number of camera profiles posted. However their selection seems mostly confined to DSLRs. I have a hybrid DSLR, the Kodak Z1015. I see only two Kodaks listed. Point & Shoot cameras are quite popular and may be more in use than the highly expensive DSLRs. I wonder if there are other places where I might find a camera profile for mine. Picturecode did the owners of these expensive cameras a big favor and saved them time by posting camera profiles of their cameras. Why not mine?
Hi PA Systems,
If you look at the end of the 2nd paragraph, I have some links in the sentence that reads "In addition they make profiling charts available so you can create your own profile for your camera and lens for the most advanced auto profiling possible. ".
This is where you can go to easily create your own profile for your camera. You can download the profile chart for free and print it yourself, or for a small fee they'll send you a printed version.
Profiles specific to your camera are better than the generalized ones anyway.
Post a Comment