

NOTE: A 15% discount on Nik Software for readers of this blog by entering the code rmartinsen when you order online or call to place an order. This offer excludes 3rd party software, bundles and upgrades.
ATTENTION CS4 Users: Mandatory updates are required for Nik Software products to work with CS4.
Every so often a cool little product comes along that just makes you so much more productive that you wonder how you lived without it. It's rare, but it happens. In this case, the cool app is Nik Software's Viveza.
If you've kept up with my blog since the beginning then you know that I bought Nik Software's Color Efex Complete 3.0 and gave it a sorta okay review. I've actually come to love it now and I find myself trying to use it for nearly every photo I run through Photoshop - it's that good.
U-Point®
What makes this product, and others like Color Efex so good? The first thing that comes to my mind, especially in the case of Viveza, is its U-Point technology. This is basically a smart mask created automatically for you that isolates a part of an image based on the color that you place the point on. From there you can adjust how big of an area is impacted by the changes you will make. The easiest way to understand what is happening here is to see an effect mask (taken from Color Efex) where I used a positive U-point control on my son's face and a negative one (to exclude) on my daughters face:

Viveza only has the concept of positive masks, and by holding down the control key when adjusting the image circle you can see what elements of the image are being modified by your adjustments.
The cool thing here is that with no tedious masking, you are able to apply your changes in an instant. Anyone who has done masks in Photoshop can clearly recognize what a time saver this really is!
Now would be a good time to check out a great video of what Viveza can do!
What Makes Viveza Good?
So now that you have an idea about U-Point, I can tell you that Viveza is quite simple in that it allows you to place U-Point controls on a portion of an image and modify the Brightness, Contrast, Saturation, Hue, Red, Blue, Green, and Warmth settings for that masked area. While this may seem trivial at first, it is very easy to see how powerful this can be. Some good examples can be found under the video lessons on the Viveza home page. Here's one example where I used Viveza to partially desaturate the background and to enhance the skin tones of the kids (hover over for a before and after):

Here's another example where I created more depth by darkening the background and I improved the skin tone with a saturation adjustment:

and here's yet another where I took a nice red smoke-stack and ruined it by making it green to prove a point:

And in this case my point is quite simple - just because you can doesn't mean you should! :-) You can do some cool stuff in Viveza, but it is easy to get carried away and start making perfectly nice images quite garish by going nuts with the saturation adjustments.
I want to make another important point here too in that I spent no more than 2 minutes on any of these photos and all of the masking was done automatically by Viveza. This is powerful stuff and definitely a time saver!
But Color Efex has U-Point, why do I need Viveza?
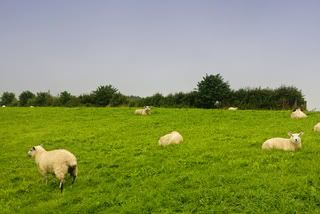
I'm still struggling to understand why Viveza isn't just a filter included with Color Efex because as a stand-alone product it is a one trick pony. However, that's the way Nik is choosing to sell them so let's do a quick test to see how this blah picture of the Ireland country-side:

can be enhanced using Viveza:

versus Color Efex 3.0's Sunny Day filter (hover for Viveza/Color Efex comparisons):
As you can see, for something like this you can get similar results with both products, but I found Color Efex to be the better tool here. It was also significantly quicker in Color Efex to get my desired results.
The Viveza version has a sky with a bit more blue (perhaps too much) because I had to manually adjust the blue channel in Viveza, whereas the Sunny Day filter in Color Efex 3.0 gave the image a more overall natural look and feel.
In the end, I'd have to say that Color Efex offers slightly better results with a more natural look and feel to my image above.
Conclusion
Overall, I like Viveza and it is great for quick minor edits, but what I don't like is the price. For what you get, I think the value is questionable, even though the product itself is very good. If it were a simple add-on to Color Efex as a new filter for maybe $40 (max), I'd probably get it and feel good about the price paid. However, as a stand-alone product its purchase price is going to be hard to justify.
I give this product a big thumbs UP for what it does, but a big thumbs down for the price, so my conclusion for this product is "recommended" for those who have used the demo on their real-world pictures and determined that what it does is worth the money.
NOTE: A 15% discount on Nik Software for readers of this blog by entering the code rmartinsen when you order online or call to place an order. This offer excludes 3rd party software, bundles and upgrades.
No comments:
Post a Comment